Audio Unit Hosting Fundamentals
All audio technologies in iOS are built on top of audio units, as shown in Figure 1-1. The higher-level technologies shown here—Media Player, AV Foundation, OpenAL, and Audio Toolbox—wrap audio units to provide dedicated and streamlined APIs for specific tasks.
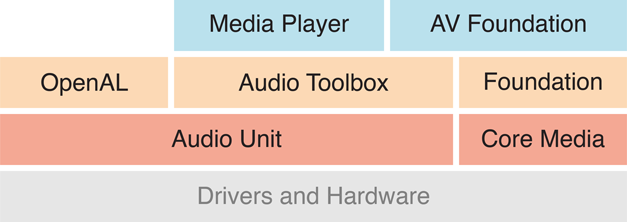
Direct use of audio units in your project is the correct choice only when you need the very highest degree of control, performance, or flexibility, or when you need a specific feature (such as acoustic echo cancelation) available only by using an audio unit directly. For an overview of iOS audio APIs, and guidance on when to use each one, refer to Multimedia Programming Guide.
Audio Units Provide Fast, Modular Audio Processing
Use audio units directly, rather than by way of higher-level APIs, when you require one of the following:
Simultaneous audio I/O (input and output) with low latency, such as for a VoIP (Voice over Internet Protocol) application
Responsive playback of synthesized sounds, such as for musical games or synthesized musical instruments
Use of a specific audio unit feature such as acoustic echo cancelation, mixing, or tonal equalization
A processing-chain architecture that lets you assemble audio processing modules into flexible networks. This is the only audio API in iOS offering this capability.
Audio Units in iOS
iOS provides seven audio units arranged into four categories by purpose, as shown in Table 1-1.
Purpose | Audio units |
|---|---|
Effect | iPod Equalizer |
Mixing | 3D Mixer Multichannel Mixer |
I/O | Remote I/O Voice-Processing I/O Generic Output |
Format conversion | Format Converter |
The identifiers you use to specify these audio units programmatically are listed in Identifier Keys for Audio Units.
Effect Unit
iOS 4 provides one effect unit, the iPod Equalizer, the same equalizer used by the built-in iPod app. To view the iPod app’s user interface for this audio unit, go to Settings > iPod > EQ. When using this audio unit, you must provide your own UI. This audio unit offers a set of preset equalization curves such as Bass Booster, Pop, and Spoken Word.
Mixer Units
iOS provides two mixer units. The 3D Mixer unit is the foundation upon which OpenAL is built. In most cases, if you need the features of the 3D Mixer unit, your best option is to use OpenAL which provides a higher level API that is well suited for game apps. For sample code that shows how to use OpenAL, see the sample code project oalTouch.
The Multichannel Mixer unit provides mixing for any number of mono or stereo streams, with a stereo output. You can turn each input on or off, set its input gain, and set its stereo panning position. For a demonstration of how to use this audio unit, see the sample code project Audio Mixer (MixerHost).
I/O Units
iOS provides three I/O units. The Remote I/O unit is the most commonly used. It connects to input and output audio hardware and gives you low–latency access to individual incoming and outgoing audio sample values. It provides format conversion between the hardware audio formats and your application audio format, doing so by way of an included Format Converter unit. For sample code that shows how to use the Remote I/O unit, see the sample code project aurioTouch.
The Voice-Processing I/O unit extends the Remote I/O unit by adding acoustic echo cancelation for use in a VoIP or voice-chat application. It also provides automatic gain correction, adjustment of voice-processing quality, and muting.
The Generic Output unit does not connect to audio hardware but rather provides a mechanism for sending the output of a processing chain to your application. You would typically use the Generic Output unit for offline audio processing.
Format Converter Unit
iOS 4 provides one Format Converter unit, which is typically used indirectly by way of an I/O unit.
Use the Two Audio Unit APIs in Concert
iOS has one API for working with audio units directly and another for manipulating audio processing graphs. When you host audio units in your app, you use both APIs in concert.
To work with audio units directly—configuring and controlling them—use the functions described in Audio Unit Component Services Reference.
To create and configure an audio processing graph (a processing chain of audio units) use the functions described in Audio Unit Processing Graph Services Reference.
There is some overlap between the two APIs and you are free to mix and match according to your programming style. The audio unit API and audio processing graph API each provide functions for:
Obtaining references to the dynamically-linkable libraries that define audio units
Instantiating audio units
Interconnecting audio units and attaching render callback functions
Starting and stopping audio flow
This document provides code examples for using both APIs but focuses on the audio processing graph API. Where there is a choice between the two APIs in your code, use the processing graph API unless you have a specific reason not to. Your code will be more compact, easier to read, and more amenable to supporting dynamic reconfiguration (see Audio Processing Graphs Provide Thread Safety).
Use Identifiers to Specify and Obtain Audio Units
To find an audio unit at runtime, start by specifying its type, subtype, and manufacturer keys in an audio component description data structure. You do this whether using the audio unit or audio processing graph API. Listing 1-1 shows how.
Listing 1-1 Creating an audio component description to identify an audio unit
AudioComponentDescription ioUnitDescription; |
ioUnitDescription.componentType = kAudioUnitType_Output; |
ioUnitDescription.componentSubType = kAudioUnitSubType_RemoteIO; |
ioUnitDescription.componentManufacturer = kAudioUnitManufacturer_Apple; |
ioUnitDescription.componentFlags = 0; |
ioUnitDescription.componentFlagsMask = 0; |
This description specifies exactly one audio unit—the Remote I/O unit. The keys for this and other iOS audio units are listed in Identifier Keys for Audio Units. Note that all iOS audio units use the kAudioUnitManufacturer_Apple key for the componentManufacturer field.
To create a wildcard description, set one or more of the type/subtype fields to 0. For example, to match all the I/O units, change Listing 1-1 to use a value of 0 for the componentSubType field.
With a description in hand, you obtain a reference to the library for the specified audio unit (or set of audio units) using either of two APIs. The audio unit API is shown in Listing 1-2.
Listing 1-2 Obtaining an audio unit instance using the audio unit API
AudioComponent foundIoUnitReference = AudioComponentFindNext ( |
NULL, |
&ioUnitDescription |
); |
AudioUnit ioUnitInstance; |
AudioComponentInstanceNew ( |
foundIoUnitReference, |
&ioUnitInstance |
); |
Passing NULL to the first parameter of AudioComponentFindNext tells this function to find the first system audio unit matching the description, using a system-defined ordering. If you instead pass a previously found audio unit reference in this parameter, the function locates the next audio unit matching the description. This usage lets you, for example, obtain references to all of the I/O units by repeatedly calling AudioComponentFindNext.
The second parameter to the AudioComponentFindNext call refers to the audio unit description defined in Listing 1-1.
The result of the AudioComponentFindNext function is a reference to the dynamically-linkable library that defines the audio unit. Pass the reference to the AudioComponentInstanceNew function to instantiate the audio unit, as shown in Listing 1-2.
You can instead use the audio processing graph API to instantiate an audio unit. Listing 1-3 shows how.
Listing 1-3 Obtaining an audio unit instance using the audio processing graph API
// Declare and instantiate an audio processing graph |
AUGraph processingGraph; |
NewAUGraph (&processingGraph); |
// Add an audio unit node to the graph, then instantiate the audio unit |
AUNode ioNode; |
AUGraphAddNode ( |
processingGraph, |
&ioUnitDescription, |
&ioNode |
); |
AUGraphOpen (processingGraph); // indirectly performs audio unit instantiation |
// Obtain a reference to the newly-instantiated I/O unit |
AudioUnit ioUnit; |
AUGraphNodeInfo ( |
processingGraph, |
ioNode, |
NULL, |
&ioUnit |
); |
This code listing introduces AUNode, an opaque type that represents an audio unit in the context of an audio processing graph. You receive a reference to the new audio unit instance, in the ioUnit parameter, on output of the AUGraphNodeInfo function call.
The second parameter to the AUGraphAddNode call refers to the audio unit description defined in Listing 1-1.
Having obtained an audio unit instance, you can configure it. To do so, you need to learn about two audio unit characteristics, scopes and elements.
Use Scopes and Elements to Specify Parts of Audio Units
The parts of an audio unit are organized into scopes and elements, as shown in Figure 1-2. When invoking a function to configure or control an audio unit, you specify the scope and element to identify the specific target of the function.
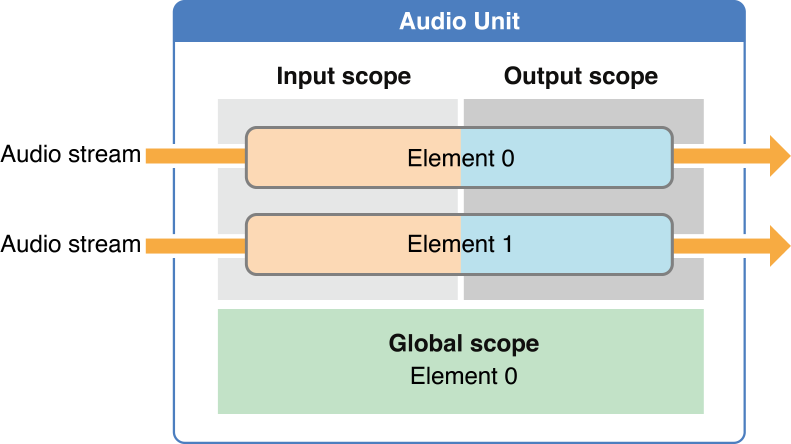
A scope is a programmatic context within an audio unit. Although the name global scope might suggest otherwise, these contexts are never nested. You specify the scope you are targeting by using a constant from the Audio Unit Scopes enumeration.
An element is a programmatic context nested within an audio unit scope. When an element is part of an input or output scope, it is analogous to a signal bus in a physical audio device—and for that reason is sometimes called a bus. These two terms—element and bus—refer to exactly the same thing in audio unit programming. This document uses “bus” when emphasizing signal flow and uses “element” when emphasizing a specific functional aspect of an audio unit, such the input and output elements of an I/O unit (see Essential Characteristics of I/O Units).
You specify an element (or bus) by its zero-indexed integer value. If setting a property or parameter that applies to a scope as a whole, specify an element value of 0.
Figure 1-2 illustrates one common architecture for an audio unit, in which the numbers of elements on input and output are the same. However, various audio units use various architectures. A mixer unit, for example, might have several input elements but a single output element. You can extend what you learn here about scopes and elements to any audio unit, despite these variations in architecture.
The global scope, shown at the bottom of Figure 1-2, applies to the audio unit as a whole and is not associated with any particular audio stream. It has exactly one element, namely element 0. Some properties, such as maximum frames per slice (kAudioUnitProperty_MaximumFramesPerSlice), apply only to the global scope.
The input and output scopes participate directly in moving one or more audio streams through the audio unit. As you’d expect, audio enters at the input scope and leaves at the output scope. A property or parameter may apply to an input or output scope as a whole, as is the case for the element count property (kAudioUnitProperty_ElementCount), for example. Other properties and parameters, such as the enable I/O property (kAudioOutputUnitProperty_EnableIO) or the volume parameter (kMultiChannelMixerParam_Volume), apply to a specific element within a scope.
Use Properties to Configure Audio Units
An audio unit property is a key-value pair you can use to configure an audio unit. The key for a property is a unique integer with an associated mnemonic identifier, such as kAudioUnitProperty_MaximumFramesPerSlice = 14. Apple reserves property keys from 0 through 63999. In Mac OS X, third-party audio units make use of keys above this range.
The value for each property is of a designated data type and has a designated read/write access, as described in Audio Unit Properties Reference. To set any property on any audio unit, you use one flexible function: AudioUnitSetProperty. Listing 1-4 shows a typical use of this function, with comments highlighting how to specify the scope and element as well as indicating the key and value for the property.
Listing 1-4 Using scope and element when setting a property
UInt32 busCount = 2; |
OSStatus result = AudioUnitSetProperty ( |
mixerUnit, |
kAudioUnitProperty_ElementCount, // the property key |
kAudioUnitScope_Input, // the scope to set the property on |
0, // the element to set the property on |
&busCount, // the property value |
sizeof (busCount) |
); |
Here are a few properties you’ll use frequently in audio unit development. Become familiar with each of these by reading its reference documentation and by exploring Apple’s audio unit sample code projects such as Audio Mixer (MixerHost):
kAudioOutputUnitProperty_EnableIO, for enabling or disabling input or output on an I/O unit. By default, output is enabled but input is disabled.kAudioUnitProperty_ElementCount, for configuring the number of input elements on a mixer unit, for example.kAudioUnitProperty_MaximumFramesPerSlice, for specifying the maximum number of frames of audio data an audio unit should be prepared to produce in response to a render call. For most audio units, in most scenarios, you must set this property as described in the reference documentation. If you don’t, your audio will stop when the screen locks.kAudioUnitProperty_StreamFormat, for specifying the audio stream data format for a particular audio unit input or output bus.
Most property values can be set only when an audio unit is uninitialized. Such properties are not intended to be changed by the user. Some, though, such as the kAudioUnitProperty_PresentPreset property of the iPod EQ unit, and the kAUVoiceIOProperty_MuteOutput property of the Voice-Processing I/O unit, are intended to be changed while playing audio.
To discover a property’s availability, access its value, and monitor changes to its value, use the following functions:
AudioUnitGetPropertyInfo—To discover whether a property is available; if it is, you are given the data size for its value and whether or not you can change the valueAudioUnitGetProperty,AudioUnitSetProperty—To get or set the value of a propertyAudioUnitAddPropertyListener,AudioUnitRemovePropertyListenerWithUserData—To install or remove a callback function for monitoring changes to a property’s value
Use Parameters and UIKit to Give Users Control
An audio unit parameter is a user-adjustable setting that can change while an audio unit is producing audio. Indeed, the intention of most parameters (such as volume or stereo panning position) is real-time adjustment of the processing that an audio unit is performing.
Like an audio unit property, an audio unit parameter is a key-value pair. The key is defined by the audio unit it applies to. It is always an enumeration constant, such as kMultiChannelMixerParam_Pan = 2, that is unique to the audio unit but not globally unique.
Unlike property values, every parameter value is of the same type: 32-bit floating point. The permissible range for a value, and the unit of measure that it represents, are determined by the audio unit’s implementation of the parameter. These and other aspects of the parameters in iOS audio units are described in Audio Unit Parameters Reference.
To get or set a parameter value, use one of the following functions, which are fully described in Audio Unit Component Services Reference:
To allow users to control an audio unit, give them access to its parameters by way of a user interface. Start by choosing an appropriate class from UIKit framework to represent the parameter. For example, for an on/off feature, such as the Multichannel Mixer unit’s kMultiChannelMixerParam_Enable parameter, you could use a UISwitch object. For a continuously varying feature, such as stereo panning position as provided by the kMultiChannelMixerParam_Pan parameter, you could use a UISlider object.
Convey the value of the UIKit object’s current configuration—such as the position of the slider thumb for a UISlider—to the audio unit. Do so by wrapping the AudioUnitSetParameter function in an IBAction method and establishing the required connection in Interface Builder. For sample code illustrating how to do this, see the sample code project Audio Mixer (MixerHost).
Essential Characteristics of I/O Units
I/O units are the one type of audio unit used in every audio unit app and are unusual in several ways. For both these reasons, you must become acquainted with the essential characteristics of I/O units to gain facility in audio unit programming.
An I/O unit contains exactly two elements, as you see in Figure 1-3.
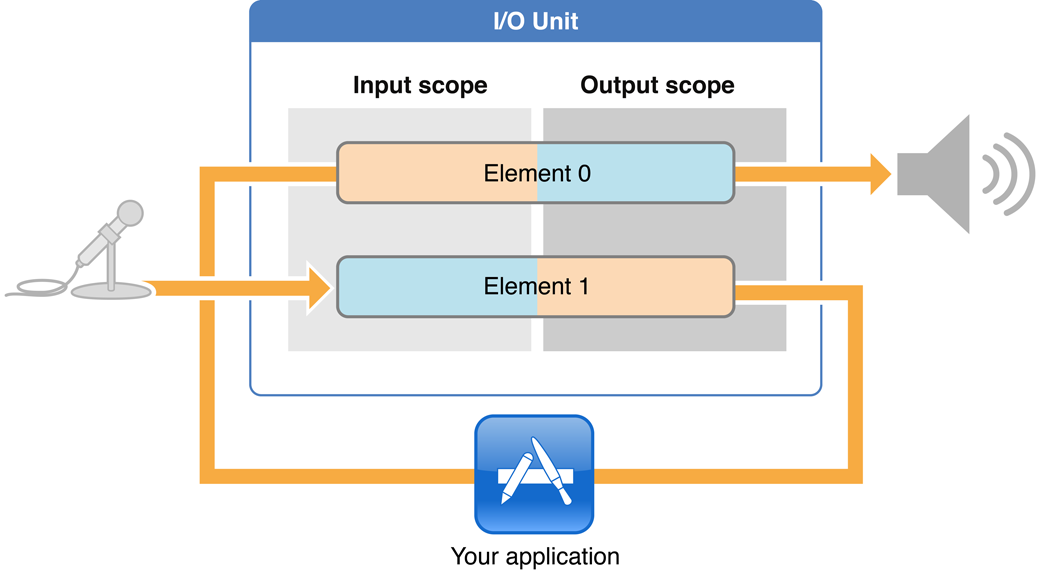
Although these two elements are parts of one audio unit, your app treats them largely as independent entities. For example, you employ the enable I/O property (kAudioOutputUnitProperty_EnableIO) to enable or disable each element independently, according to the needs of your app.
Element 1 of an I/O unit connects directly to the audio input hardware on a device, represented in the figure by a microphone. This hardware connection—at the input scope of element 1—is opaque to you. Your first access to audio data entering from the input hardware is at the output scope of element 1.
Similarly, element 0 of an I/O unit connects directly the audio output hardware on a device, represented in Figure 1-3 by the loudspeaker. You can convey audio to the input scope of element 0, but its output scope is opaque.
Working with audio units, you’ll often hear the two elements of an I/O unit described not by their numbers but by name:
The input element is element 1 (mnemonic device: the letter “I” of the word “Input” has an appearance similar to the number 1)
The output element is element 0 (mnemonic device: the letter “O” of the word “Output” has an appearance similar to the number 0)
As you see in Figure 1-3, each element itself has an input scope and an output scope. For this reason, describing these parts of an I/O unit may get a bit confusing. For example, you would say that in a simultaneous I/O app, you receive audio from the output scope of the input element and send audio to the input scope of the output element. When you need to, return to this figure.
Finally, I/O units are the only audio units capable of starting and stopping the flow of audio in an audio processing graph. In this way, the I/O unit is in charge of the audio flow in your audio unit app.
Audio Processing Graphs Manage Audio Units
An audio processing graph is a Core Foundation–style opaque type, AUGraph, that you use to construct and manage an audio unit processing chain. A graph can leverage the capabilities of multiple audio units and multiple render callback functions, allowing you to create nearly any audio processing solution you can imagine.
The AUGraph type adds thread safety to the audio unit story: It enables you to reconfigure a processing chain on the fly. For example, you could safely insert an equalizer, or even swap in a different render callback function for a mixer input, while audio is playing. In fact, the AUGraph type provides the only API in iOS for performing this sort of dynamic reconfiguration in an audio app.
The audio processing graph API uses another opaque type, AUNode, to represent an individual audio unit within the context of a graph. When using a graph, you usually interact with nodes as proxies for their contained audio units rather than interacting with the audio units directly.
When putting a graph together, however, you must configure each audio unit, and to do that you must interact directly with the audio units by way of the audio unit API. Audio unit nodes, per se, are not configurable. In this way, constructing a graph requires you to use the both APIs, as explained in Use the Two Audio Unit APIs in Concert.
You can also use an AUNode instance as an element in a complex graph by defining the node to represent a complete audio processing subgraph. In this case, the I/O unit at the end of the subgraph must be a Generic Output unit—the one type of I/O unit that does not connect to device hardware.
In broad strokes, constructing an audio processing graph entails three tasks:
Adding nodes to a graph
Directly configuring the audio units represented by the nodes
Interconnecting the nodes
For details on these tasks and on the rest of the audio processing graph life cycle, refer to Constructing Audio Unit Apps. For a complete description of this rich API, see Audio Unit Processing Graph Services Reference.
An Audio Processing Graph Has Exactly One I/O Unit
Every audio processing graph has one I/O unit, whether you are doing recording, playback, or simultaneous I/O. The I/O unit can be any one of those available in iOS, depending on the needs of your app. For details on how I/O units fit into the architecture of an audio processing graph in various usage scenarios, see Start by Choosing a Design Pattern.
Graphs let you start and stop the flow of audio by way of the AUGraphStart and AUGraphStop functions. These functions, in turn, convey the start or stop message to the I/O unit by invoking its AudioOutputUnitStart or AudioOutputUnitStop function. In this way, a graph’s I/O unit is in charge of the audio flow in the graph.
Audio Processing Graphs Provide Thread Safety
The audio processing graph API employs a “to-do list” metaphor to provide thread safety. Certain functions in this API add a unit of work to a list of changes to execute later. After you specify a complete set of changes, you then ask the graph to implement them.
Here are some common reconfigurations supported by the audio processing graph API, along with their associated functions:
Adding or removing audio unit nodes (
AUGraphAddNode,AUGraphRemoveNode)Adding or removing connections between nodes (
AUGraphConnectNodeInput,AUGraphDisconnectNodeInput)Connecting a render callback function to an input bus of an audio unit (
AUGraphSetNodeInputCallback)
Let’s look at an example of reconfiguring a running audio processing graph. Say, for example, you’ve built a graph that includes a Multichannel Mixer unit and a Remote I/O unit, for mixed playback of two synthesized sounds. You feed the sounds to two input buses of the mixer. The mixer output goes to the output element of the I/O unit and on to the output audio hardware. Figure 1-4 depicts this architecture.
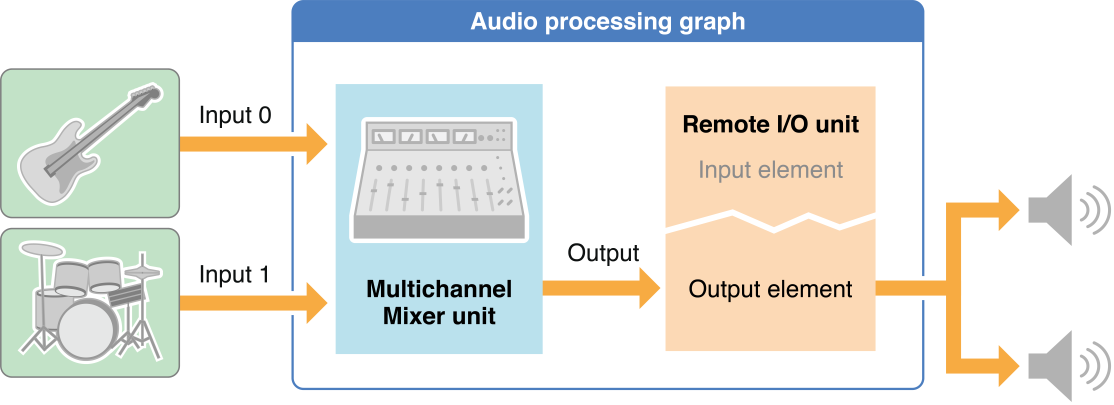
Now, say the user wants to insert an equalizer into one of the two audio streams. To do that, add an iPod EQ unit between the feed of one of the sounds and the mixer input that it goes to, as shown in Figure 1-5.

The steps to accomplish this live reconfiguration are as follows:
Disconnect the “beats sound” callback from input 1 of the mixer unit by calling
AUGraphDisconnectNodeInput.Add an audio unit node containing the iPod EQ unit to the graph. Do this by specifying the iPod EQ unit with an
AudioComponentDescriptionstructure, then callingAUGraphAddNode. At this point, the iPod EQ unit is instantiated but not initialized. It is owned by the graph but is not yet participating in the audio flow.Configure and initialize the iPod EQ unit. In this example, this entails a few things:
Call the
AudioUnitGetPropertyfunction to retrieve the stream format (kAudioUnitProperty_StreamFormat) from the mixer input.Call the
AudioUnitSetPropertyfunction twice, once to set that stream format on the iPod EQ unit’s input and a second time to set it on the output. (For a complete description of how to configure an iPod EQ unit, see Using Effect Units.)Call the
AudioUnitInitializefunction to allocate resources for the iPod EQ unit and prepare it to process audio. This function call is not thread-safe, but you can (and must) perform it at this point in the sequence, when the iPod EQ unit is not yet participating actively in the audio processing graph because you have not yet called theAUGraphUpdatefunction.
Attach the “beats sound” callback function to the input of the iPod EQ by calling
AUGraphSetNodeInputCallback.
In the preceding list, steps 1, 2, and 4—all of them AUGraph* function calls—were added to the graph’s “to-do” list. Call AUGraphUpdate to execute these pending tasks. On successful return of the AUGraphUpdate function, the graph has been dynamically reconfigured and the iPod EQ is in place and processing audio.
Audio Flows Through a Graph Using “Pull”
In an audio processing graph, the consumer calls the provider when it needs more audio data. There is a flow of requests for audio data, and this flow proceeds in a direction opposite to that of the flow of audio. Figure 1-6 illustrates this mechanism.
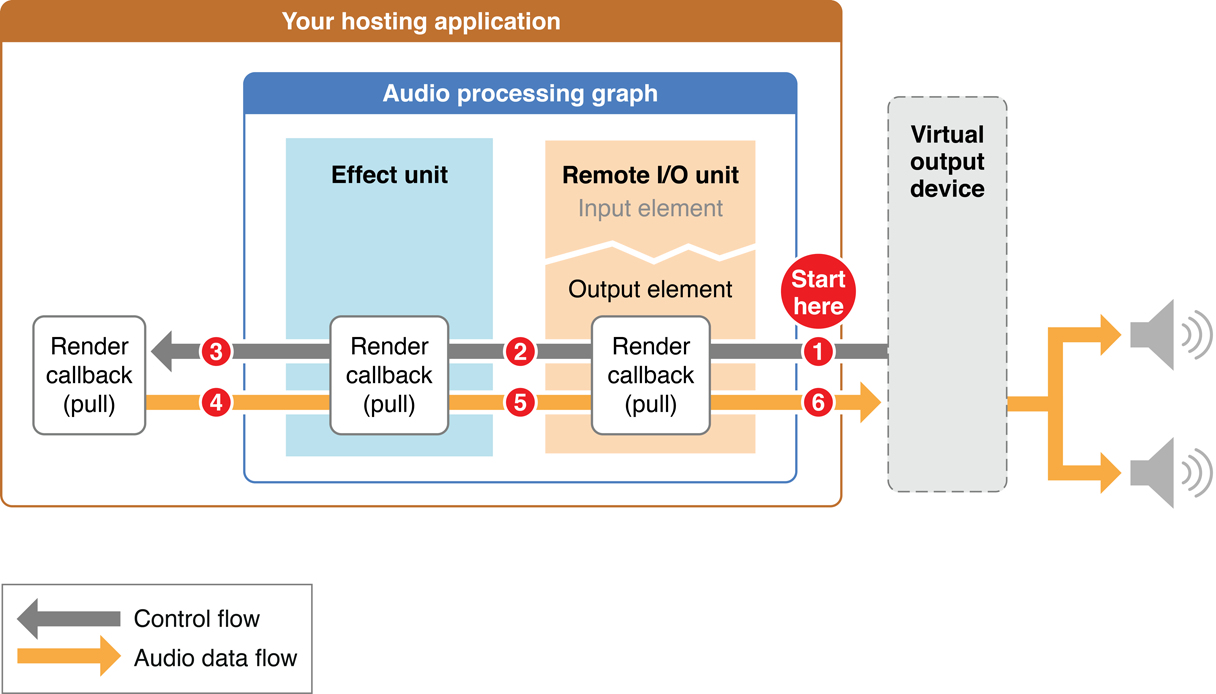
Each request for a set of data is known as a render call or, informally, as a pull. The figure represents render calls as gray “control flow” arrows. The data requested by a render call is more properly known as a set of audio sample frames (see frame).
In turn, a set of audio sample frames provided in response to a render call is known as a slice. (See slice.) The code that provides the slice is known as a render callback function, described in Render Callback Functions Feed Audio to Audio Units.
Here is how the pull proceeds in Figure 1-6:
After you call the
AUGraphStartfunction, the virtual output device invokes the render callback of the Remote I/O unit’s output element. This invocation asks for one slice of processed audio data frames.The render callback function of the Remote I/O unit looks in its input buffers for audio data to process, to satisfy the render call. If there is data waiting to be processed, the Remote I/O unit uses it. Otherwise, and as shown in the figure, it instead invokes the render callback of whatever your app has connected to its input. In this example, the Remote I/O unit’s input is connected to an effect unit’s output. So, the I/O unit pulls on the effect unit, asking for a slice of audio frames.
The effect unit behaves just as the Remote I/O unit did. When it needs audio data, it gets it from its input connection. In this example, the effect unit pulls on your app’s render callback function.
Your app’s render callback function is the final recipient of the pull. It supplies the requested frames to the effect unit.
The effect unit processes the slice supplied by your app’s render callback. The effect unit then supplies the processed data that were previously requested (in step 2) to the Remote I/O unit.
The Remote I/O unit processes the slice provided by the effect unit. The Remote I/O unit then supplies the processed slice originally requested (in step 1) to the virtual output device. This completes one cycle of pull.
Render Callback Functions Feed Audio to Audio Units
To provide audio from disk or memory to an audio unit input bus, convey it using a render callback function that conforms to the AURenderCallback prototype. The audio unit input invokes your callback when it needs another slice of sample frames, as described in Audio Flows Through a Graph Using Pull.
The process of writing a render callback function is perhaps the most creative aspect of designing and building an audio unit application. It’s your opportunity to generate or alter sound in any way you can imagine and code.
At the same time, render callbacks have a strict performance requirement that you must adhere to. A render callback lives on a real-time priority thread on which subsequent render calls arrive asynchronously. The work you do in the body of a render callback takes place in this time-constrained environment. If your callback is still producing sample frames in response to the previous render call when the next render call arrives, you get a gap in the sound. For this reason you must not take locks, allocate memory, access the file system or a network connection, or otherwise perform time-consuming tasks in the body of a render callback function.
Understanding the Audio Unit Render Callback Function
Listing 1-5 shows the header of a render callback function that conforms to the AURenderCallback prototype. This section describes the purpose of each of its parameters in turn and explains how to use each one.
Listing 1-5 A render callback function header
static OSStatus MyAURenderCallback ( |
void *inRefCon, |
AudioUnitRenderActionFlags *ioActionFlags, |
const AudioTimeStamp *inTimeStamp, |
UInt32 inBusNumber, |
UInt32 inNumberFrames, |
AudioBufferList *ioData |
) { /* callback body */ } |
The inRefCon parameter points to a programmatic context you specify when attaching the callback to an audio unit input (see Write and Attach Render Callback Functions). The purpose of this context is to provide the callback function with any audio input data or state information it needs to calculate the output audio for a given render call.
The ioActionFlags parameter lets a callback provide a hint to the audio unit that there is no audio to process. Do this, for example, if your app is a synthetic guitar and the user is not currently playing a note. During a callback invocation for which you want to output silence, use a statement like the following in the body of the callback:
*ioActionFlags |= kAudioUnitRenderAction_OutputIsSilence; |
When you want to produce silence, you must also explicitly set the buffers pointed at by the ioData parameter to 0. There’s more about this in the description for that parameter.
The inTimeStamp parameter represents the time at which the callback was invoked. It contains an AudioTimeStamp structure, whose mSampleTime field is a sample-frame counter. On each invocation of the callback, the value of the mSampleTime field increments by the number in the inNumberFrames parameter. If your app is a sequencer or a drum machine, for example, you can use the mSampleTime value for scheduling sounds.
The inBusNumber parameter indicates the audio unit bus that invoked the callback, allowing you to branch within the callback depending on this value. In addition, when attaching a callback to an audio unit, you can specify a different context (inRefCon) for each bus.
The inNumberFrames parameter indicates the number of audio sample frames that the callback is being asked to provide on the current invocation. You provide those frames to the buffers in the ioData parameter.
The ioData parameter points to the audio data buffers that the callback must fill when it is invoked. The audio you place into these buffers must conform to the audio stream format of the bus that invoked the callback.
If you are playing silence for a particular invocation of the callback, explicitly set these buffers to 0, such as by using the memset function.
Figure 1-7 depicts a pair of noninterleaved stereo buffers in an ioData parameter. Use the elements of the figure to visualize the details of ioData buffers that your callback needs to fill.
ioData buffers for a stereo render callback function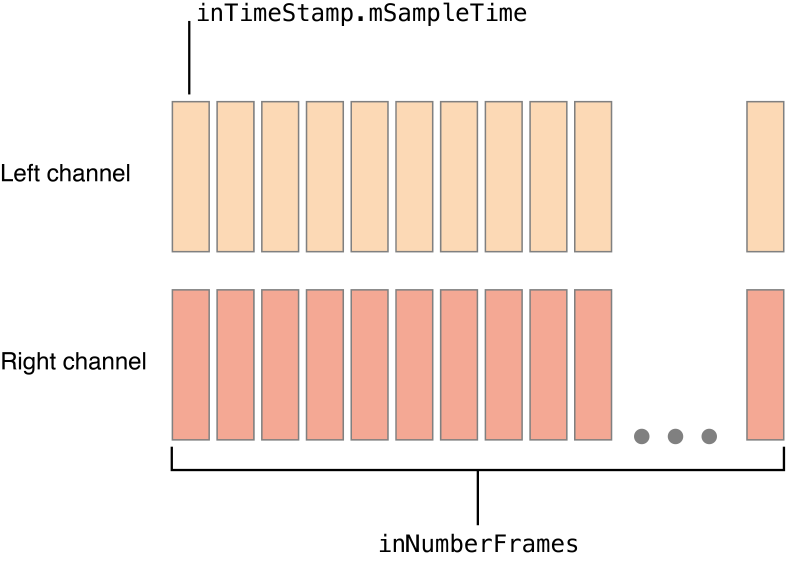
Audio Stream Formats Enable Data Flow
When working with audio data at the individual sample level, as you are when using audio units, it’s not enough to specify the correct data type to represent the audio. The layout of the bits in a single audio sample value has meaning, so a data type like Float32 or UInt16 is not expressive enough. In this section you learn about Core Audio’s solution to this problem.
Working with the AudioStreamBasicDescription structure
The currency for moving audio values around in your app, and between your app and audio hardware, is the AudioStreamBasicDescription structure, shown in Listing 1-6 and described fully in Core Audio Data Types Reference.
Listing 1-6 The AudioStreamBasicDescription structure
struct AudioStreamBasicDescription { |
Float64 mSampleRate; |
UInt32 mFormatID; |
UInt32 mFormatFlags; |
UInt32 mBytesPerPacket; |
UInt32 mFramesPerPacket; |
UInt32 mBytesPerFrame; |
UInt32 mChannelsPerFrame; |
UInt32 mBitsPerChannel; |
UInt32 mReserved; |
}; |
typedef struct AudioStreamBasicDescription AudioStreamBasicDescription; |
Because the name AudioStreamBasicDescription is long, it’s often abbreviated in conversation and documentation as ASBD. To define values for the fields of an ASBD, write code similar to that shown in Listing 1-7.
Listing 1-7 Defining an ASBD for a stereo stream
size_t bytesPerSample = sizeof (AudioUnitSampleType); |
AudioStreamBasicDescription stereoStreamFormat = {0}; |
stereoStreamFormat.mFormatID = kAudioFormatLinearPCM; |
stereoStreamFormat.mFormatFlags = kAudioFormatFlagsAudioUnitCanonical; |
stereoStreamFormat.mBytesPerPacket = bytesPerSample; |
stereoStreamFormat.mBytesPerFrame = bytesPerSample; |
stereoStreamFormat.mFramesPerPacket = 1; |
stereoStreamFormat.mBitsPerChannel = 8 * bytesPerSample; |
stereoStreamFormat.mChannelsPerFrame = 2; // 2 indicates stereo |
stereoStreamFormat.mSampleRate = graphSampleRate; |
To start, determine the data type to represent one audio sample value. This example uses the AudioUnitSampleType defined type, the recommended data type for most audio units. In iOS, AudioUnitSampleType is defined to be an 8.24 fixed-point integer. The first line in Listing 1-7 calculates the number of bytes in the type; that number is required when defining some of the field values of an ASBD, as you can see in the listing.
Next, still referring to Listing 1-7, declare a variable of type AudioStreamBasicDescription and initialize its fields to 0 to ensure that no fields contain garbage data. Do not skip this zeroing step; if you do, you are certain to run into trouble later.
Now define the ASBD field values. Specify kAudioFormatLinearPCM for the mFormatID field. Audio units use uncompressed audio data, so this is the correct format identifier to use whenever you work with audio units.
Next, for most audio units, specify the kAudioFormatFlagsAudioUnitCanonical metaflag for the mFormatFlags field. This flag is defined in CoreAudio.framework/CoreAudioTypes.h as follows:
kAudioFormatFlagsAudioUnitCanonical = kAudioFormatFlagIsFloat | |
kAudioFormatFlagsNativeEndian | |
kAudioFormatFlagIsPacked | |
kAudioFormatFlagIsNonInterleaved |
This metaflag takes care of specifying all of the layout details for the bits in a linear PCM sample value of type AudioUnitSampleType.
Certain audio units employ an atypical audio data format, requiring a different data type for samples and a different set of flags for the mFormatFlags field. For example, the 3D Mixer unit requires the UInt16 data type for its audio sample values and requires the ASBD’s mFormatFlags field to be set to kAudioFormatFlagsCanonical. When working with a particular audio unit, be careful to use the correct data format and the correct format flags. (See Using Specific Audio Units.)
Continuing through Listing 1-7, the next four fields further specify the organization and meaning of the bits in a sample frame. Set these fields—mBytesPerPacket, mBytesPerFrame, mFramesPerPacket, and mBitsPerChannel fields—according to the nature of the audio stream you are using. To learn the meaning of each of these fields, refer to the documentation for the AudioStreamBasicDescription structure. You can see an example of filled-out ASBDs in the sample code project Audio Mixer (MixerHost).
Set the ASBD’s mChannelsPerFrame field according to the number of channels in the stream—1 for mono audio, 2 for stereo, and so on.
Finally, set the mSampleRate field according to the sample rate that you are using throughout your app. Understanding Where and How to Set Stream Formats explains the importance of avoiding sample rate conversions. Configure Your Audio Session explains how to ensure that your application’s sample rate matches the audio hardware sample rate.
Rather than specify an ASBD field by field as you’ve seen here, you can use the C++ utility methods provided in the CAStreamBasicDescription.h file (/Developer/Extras/CoreAudio/PublicUtility/). In particular, view the SetAUCanonical and SetCanonical C++ methods. These specify the correct way to derive ASBD field values given three factors:
Whether the stream is for I/O (
SetCanonical) or for audio processing (SetAUCanonical)How many channels you want the stream format to represent
Whether you want the stream format interleaved or noninterleaved
Whether or not you include the CAStreamBasicDescription.h file in your project to use its methods directly, Apple recommends that you study that file to learn the correct way to work with an AudioStreamBasicDescription structure.
See Troubleshooting Tips for ideas on how to fix problems related to audio data stream formats.
Understanding Where and How to Set Stream Formats
You must set the audio data stream format at critical points in an audio processing graph. At other points, the system sets the format. At still other points, audio unit connections propagate a stream format from one audio unit to another.
The audio input and output hardware on an iOS device have system-determined audio stream formats. These formats are always uncompressed, in linear PCM format, and interleaved. The system imposes these formats on the outward-facing sides of the I/O unit in an audio processing graph, as depicted in Figure 1-8.
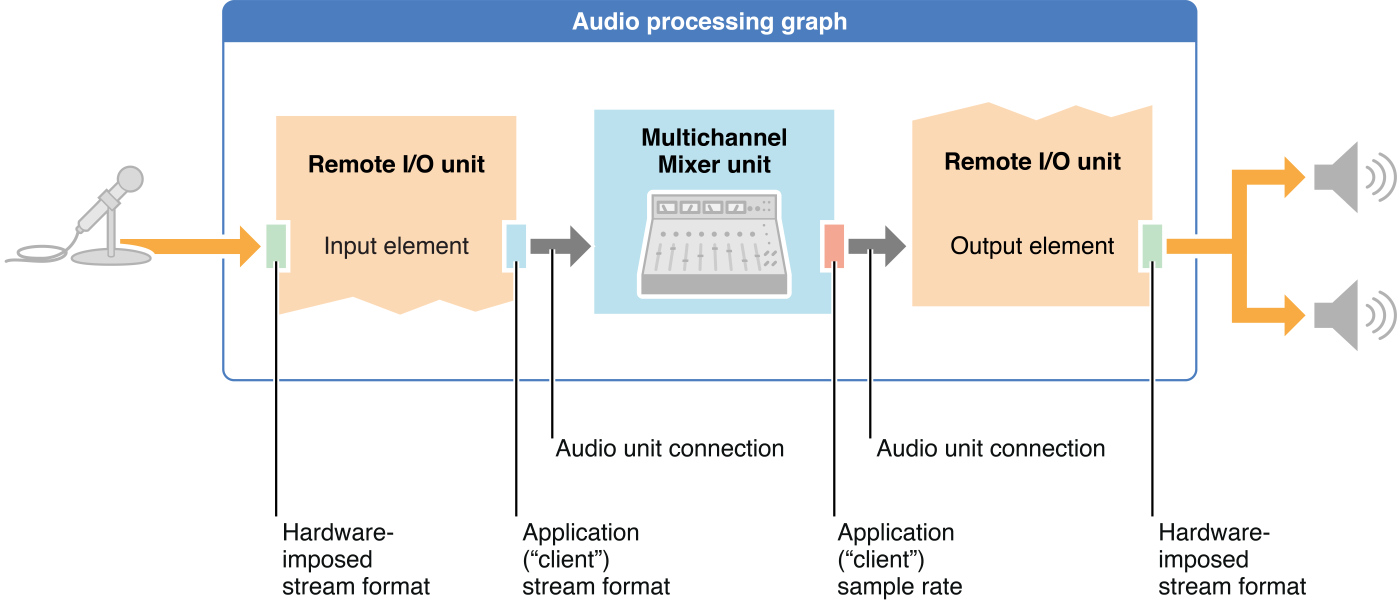

In the figure, the microphone represents the input audio hardware. The system determines the input hardware’s audio stream format and imposes it onto the input scope of the Remote I/O unit’s input element.
Similarly, the loudspeakers in the figure represent the output audio hardware. The system determines the output hardware’s stream format and imposes it onto the output scope of the Remote I/O unit’s output element.
Your application is responsible for establishing the audio stream formats on the inward-facing sides of the I/O unit’s elements. The I/O unit performs any necessary conversion between your application formats and the hardware formats. Your application is also responsible for setting stream formats wherever else they are required in a graph. In some cases, such as at the output of the Multichannel Mixer unit in Figure 1-8, you need to set only a portion of the format—specifically, the sample rate. Start by Choosing a Design Pattern shows you where to set stream formats for various types of audio unit apps. Using Specific Audio Units lists the stream format requirements for each iOS audio unit.
A key feature of an audio unit connection, as shown in Figure 1-8, is that the connection propagates the audio data stream format from the output of its source audio unit to the input of its destination audio unit. This is a critical point so it bears emphasizing: Stream format propagation takes place by way of an audio unit connection and in one direction only—from the output of a source audio unit to an input of a destination audio unit.
Take advantage of format propagation. It can significantly reduce the amount of code you need to write. For example, when connecting the output of a Multichannel Mixer unit to the Remote I/O unit for playback, you do not need to set the stream format for the I/O unit. It is set appropriately by the connection between the audio units, based on the output stream format of the mixer (see Figure 1-8).
Stream format propagation takes place at one particular point in an audio processing graph’s life cycle—namely, upon initialization. See Initialize and Start the Audio Processing Graph.
You have great flexibility in defining your application audio stream formats. However, whenever possible, use the sample rate that the hardware is using. When you do, the I/O unit need not perform sample rate conversion. This minimizes energy usage—an important consideration in a mobile device—and maximizes audio quality. To learn about working with the hardware sample rate, see Configure Your Audio Session.
Copyright © 2010 Apple Inc. All Rights Reserved. Terms of Use | Privacy Policy | Updated: 2010-09-01